The problem is that when you do not valorize an analytica driver Spagobi Server send to the engine an empty string as value.
The empty string is valid parameter value for jasper so it do not use the default one as expected. This managment of not valorized parameters can be improved in order to avoid this kind of problems. However for the moment I can suggets to you this workaround. In the jasper template for each parameter AAA that can be optionally valorized by the user define also another twin parameter named SAFE_AAA defined like this ...
($P{AAA} != null && $P{AAA}.trim().length() > 0) ? $P{AAA}: "my default value"
then use SAFE_AAA in place of AAA. Let me know if this work around works in your case.
Visualizzazione post con etichetta SpagoBI. Mostra tutti i post
Visualizzazione post con etichetta SpagoBI. Mostra tutti i post
giovedì 2 agosto 2012
giovedì 12 gennaio 2012
SpagoBI - Personalizzare pagina di login
Per personalizzare la pagina di login è necessario editare il file login.jsp dentro la cartella
apache-tomcat-6.0.33\webapps\SpagoBI\WEB-INF\jsp\wapp
lunedì 9 gennaio 2012
venerdì 23 dicembre 2011
SpagoBI - Deploy Cubo JPivot
Passi da eseguire per il deploy di un nuovo cubo:
(1) Innanzitutto è necessario impostare il valore della variabile "spagobi_resource_path" nel file \apache-tomcat\conf\server.xml con tutto il percorso
(3) aggiungere lo schema esempio.xml alla cartella \apache-tomcat\resources\Olap
(4) modificare il file \apache-tomcat\webapps\SpagoBIJPivotEngine\WEB-INF\classes\engine-config.xml aggiungendo le informazioni relative al nuovo schema

(1) Innanzitutto è necessario impostare il valore della variabile "spagobi_resource_path" nel file \apache-tomcat\conf\server.xml con tutto il percorso
<Environment name="spagobi_resource_path" type="java.lang.String" value="C:/SpagoBI/apache-tomcat-6.0.33/resources"/>(2) creare lo schema (esempio.xml)
(3) aggiungere lo schema esempio.xml alla cartella \apache-tomcat\resources\Olap
(4) modificare il file \apache-tomcat\webapps\SpagoBIJPivotEngine\WEB-INF\classes\engine-config.xml aggiungendo le informazioni relative al nuovo schema
<SCHEMAS>
<SCHEMA catalogUri="/Olap/esempio.xml" name="esempio" />
</SCHEMAS>(5) riavviare Spago e aggiungere un nuovo documento OLAP
mercoledì 14 dicembre 2011
SpagoBI e Jasper: parametri multi valore
La sintassi $X{ <IN o NOTIN>, <colonna>, <parametro>} con SpagoBI NON funziona...
Per utilizzare i parametri multi valore è necessario definire un driver anlitico su sSpagoBI di tipo stringa e associare come modalità di prompt la cheklist in modo da permettere all'utente di selezionare più valori
Nel report è necessario definire il parametro di tipo stringa e usarlo nella query in questo modo:
select * from xxxwhere cod IN ($P!{codici})
martedì 6 dicembre 2011
SpagoBI - Installazione su Oracle
http://spagobi.blogspot.com/2010/06/how-to-config-spagobi-with-oracle.html
Modificare il dialetto hibernate nel file jbpm.hibernate.cfg.xml che si trova in \webapps\SpagoBI\WEB-INF\
mettendo: org.hibernate.dialect.OracleDialect
vedere anche:
http://www.spagoworld.org/jforum/posts/list/255.page
This document records the steps to install and config the Oracle database connection as reporting data source in SpagoBI.
You can config the database connection using JNDI resource that is shared between reporting applications; or you can config JDBC data source connection, so, a new JDBC connection (non-shareable) will be created for each of reporting applications (document) execution.
Environment
============
SpagoBI: version 2.5
OS Server: Windows server 2008 R2 (x64)
App Server: Tomcat 6.0.18 (in the SpagoBI demo package)
Oracle database: 11g R2 (for windows x64)
JDBC driver: ojdbc5.jar (for JDK 1.5 or up)
Java: JDK 1.6.0_20
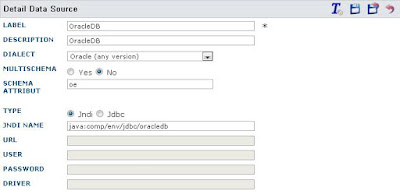
1. Create JNDI Data Source Connection
1) Download and unzip the file "Demo-SpagoBI-2.5.0-apache-tomcat-6.0.18-04092010.zip" to your local folder (liketomcathome\);
2) Copy the Oracle jdbc driver file "ojdbc5.jar" to your tomcathome\lib folder;
3) Edit the file "server.xml" at the folder "tomcathome\conf" and add / edit the following items:
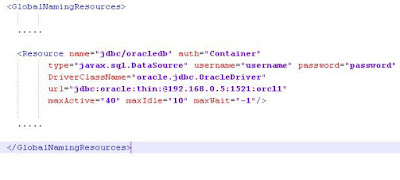
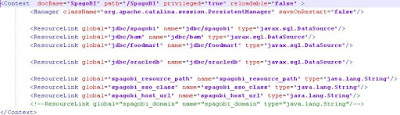
4) Edit the file "context.xml" at the folder "tomcathome\webapps\SpagoBI\META-INF" as showing below:
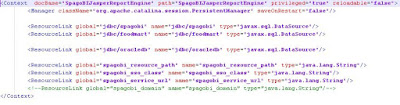
5) Edit the file "context.xml" at the folder "tomcathome\webapps\SpagoBIJasperReportEngine\META-INF" as showing below:
6) Modificare in modo opportuno il dialetto hibernate nei file "jbpm.hibernate.cfg.xml" e "hibernate.cfg.xml" (lo trovi in \webapps\SpagoBI\WEB-INF\
7) Start Tomcat server to enable the above changes;
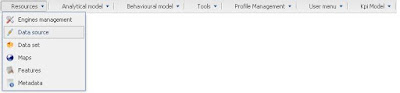
8) Log on to SpagoBI at http://localhost:8080/SpagoBI to create a data source connection:
Click "Resources" -> "Data Source"
Click Insert button (icon) to add a new data source
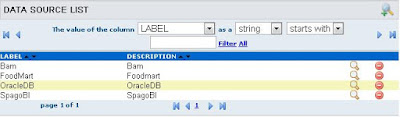
Enter the settings for the new data source
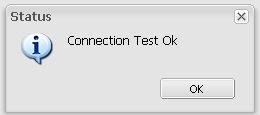
Test the new connection before you save and exit.
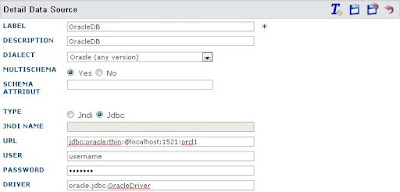
2. Create JDBC Connection
1) Download and unzip the file "Demo-SpagoBI-2.5.0-apache-tomcat-6.0.18-04092010.zip" to your local folder (liketomcathome\);
2) Copy the Oracle jdbc driver file "ojdbc5.jar" to your tomcathome\lib folder;
3) Start Tomcat server to enable the above changes;
4) Log on to SpagoBI at http://localhost:8080/SpagoBI to create a data source connection:
Click "Resources" -> "Data Source"
Click Insert button (icon) to add a new data source
Enter the settings for the new data source
Test the new connection before you save and exit.
Modificare il dialetto hibernate nel file jbpm.hibernate.cfg.xml che si trova in \webapps\SpagoBI\WEB-INF\
mettendo: org.hibernate.dialect.OracleDialect
vedere anche:
http://www.spagoworld.org/jforum/posts/list/255.page
This document records the steps to install and config the Oracle database connection as reporting data source in SpagoBI.
You can config the database connection using JNDI resource that is shared between reporting applications; or you can config JDBC data source connection, so, a new JDBC connection (non-shareable) will be created for each of reporting applications (document) execution.
Environment
============
SpagoBI: version 2.5
OS Server: Windows server 2008 R2 (x64)
App Server: Tomcat 6.0.18 (in the SpagoBI demo package)
Oracle database: 11g R2 (for windows x64)
JDBC driver: ojdbc5.jar (for JDK 1.5 or up)
Java: JDK 1.6.0_20
1. Create JNDI Data Source Connection
1) Download and unzip the file "Demo-SpagoBI-2.5.0-apache-tomcat-6.0.18-04092010.zip" to your local folder (liketomcathome\);
2) Copy the Oracle jdbc driver file "ojdbc5.jar" to your tomcathome\lib folder;
3) Edit the file "server.xml" at the folder "tomcathome\conf" and add / edit the following items:

4) Edit the file "context.xml" at the folder "tomcathome\webapps\SpagoBI\META-INF" as showing below:

5) Edit the file "context.xml" at the folder "tomcathome\webapps\SpagoBIJasperReportEngine\META-INF" as showing below:

6) Modificare in modo opportuno il dialetto hibernate nei file "jbpm.hibernate.cfg.xml" e "hibernate.cfg.xml" (lo trovi in \webapps\SpagoBI\WEB-INF\
7) Start Tomcat server to enable the above changes;
8) Log on to SpagoBI at http://localhost:8080/SpagoBI to create a data source connection:
Click "Resources" -> "Data Source"

Click Insert button (icon) to add a new data source

Enter the settings for the new data source

Test the new connection before you save and exit.

2. Create JDBC Connection
1) Download and unzip the file "Demo-SpagoBI-2.5.0-apache-tomcat-6.0.18-04092010.zip" to your local folder (liketomcathome\);
2) Copy the Oracle jdbc driver file "ojdbc5.jar" to your tomcathome\lib folder;
3) Start Tomcat server to enable the above changes;
4) Log on to SpagoBI at http://localhost:8080/SpagoBI to create a data source connection:
Click "Resources" -> "Data Source"
Click Insert button (icon) to add a new data source
Enter the settings for the new data source

Test the new connection before you save and exit.
giovedì 29 settembre 2011
SpagoBI - Multi value profile attribute
In Spago è possibile definire un attributo di profilo (profile attribute) di tipo multi-value.
A livello di definizione dell'attributo i valori si dichiarano con la seguente sintassi:
A livello di definizione dell'attributo i valori si dichiarano con la seguente sintassi:
{splitter_character {list_of_values_separated_by_splitter_character} }
Ad esempio ipotizziamo di dichiarare il profile attribute "store_city" in questo modo:
{,{Padova,Roma,Venezia}}
Dove il primo carattere (",") rappresenta il separatore utilizzato nell'elenco.
All'interno dei LOV è possibile utilizzare gli attributi multi value con questa sintassi:
${name_of_profile_attribute(prefix;splitter;suffix)}
Dove il risulatato sarà:
prefix + list of values separeted by the splitter + suffix
Esempio:
select * from customerswhere city in ${store_city( (' ; ',' ; ') )}
(in giallo il prefisso e il suffisso, in azzurro il separatore)
Diventerà:
Diventerà:
select * from customers where city in ('Padova','Roma','Venezia')
mercoledì 10 agosto 2011
SpagoBI - Documento con formato di output excel o pdf o...
Per determinare il formato di output di un documento SpagoBI è sufficiente aggiungere un parametro denominato outputType.
Questo paramentro determina il formato con cui il documento deve essere prodotto e può assumere i seguenti valori:
Questo paramentro determina il formato con cui il documento deve essere prodotto e può assumere i seguenti valori:
- XLS
- JPG
- CSV
- XML
- TXT
- PPT
- RTF
- JRXML
- HTML
- ...
SpaboBI - Modificare le impostazioni di esportazione in excel
Aprire il file
\webapps\SpagoBIJasperReportEngine\WEB-INF\classes\jasperreport.properties
e aggiungere i parametri di esportazione excel impostandoli secondo le esigenze:
net.sf.jasperreports.awt.ignore.missing.font=true
net.sf.jasperreports.export.xls.create.custom.palette=false
net.sf.jasperreports.export.xls.one.page.per.sheet=false
net.sf.jasperreports.export.xls.remove.empty.space.between.rows=true
net.sf.jasperreports.export.xls.remove.empty.space.between.columns=true
net.sf.jasperreports.export.xls.white.page.background=false
net.sf.jasperreports.export.xls.detect.cell.type=true
net.sf.jasperreports.export.xls.size.fix.enabled=false
net.sf.jasperreports.export.xls.ignore.graphics=false
net.sf.jasperreports.export.xls.collapse.row.span=true
net.sf.jasperreports.export.xls.ignore.cell.border=true
net.sf.jasperreports.export.xls.ignore.cell.background=true
net.sf.jasperreports.export.xls.max.rows.per.sheet=0
net.sf.jasperreports.export.xls.wrap.text=true
è anche possibile aggiungere:
#net.sf.jasperreports.export.xls.password=pa22w0rd
Iscriviti a:
Commenti (Atom)